Correcting the Surface Pro Date and Time
RSDM IT is in the process of investigating an issue in which the date and time on the student issued Microsoft Surfaces may not be correct. Until a more permanent resolution can be put in place, we suggest manually configuring the date and time prior to any exams administered through ExamSoft. This guide will step you through the process of doing so.
Accessing the Surface Pro UEFI Settings
In order to manually configure the date and time, you will need to first access the UEFI settings. To do so, follow one of the two methods listed below.
Method 1 – Via the Surface boot-up process
- Shut down your Surface and wait about 10 seconds to make sure it’s off.
- Press and hold the volume-up button on your Surface, and, at the same time, press and release the power button.
- The Microsoft or Surface logo appears on your screen. Continue to hold the volume-up button. Release the button once the UEFI screen appears.
Method 2 – Via Windows 10 Settings
- Select Start > Settings > Update & security > Recovery.
- Under Advanced startup, select Restart Now.
- Under Choose an option, select Troubleshoot > Advanced Options > UEFI Firmware Settings, and then select Restart.
Setting the Date and Time
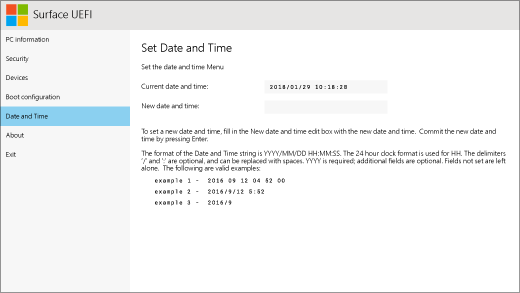
Once you have accessed the UEFI settings screen, select Date and Time from the navigation menu and enter the correct date and time into the New date and time text field (Fig 1).

Note that when entering the date and time you must enter the time in 24 hour (Military Time) format.
Once you have entered the new date and time, press Enter then select Exit from the navigation menu.
After your computer has rebooted, it should display the correct date and time.