Printing from LA Computers
This is basic information about LA printers and some printing tips. For printer problems or for help printing, contact LA IT support at landarch-help@sebs.rutgers.edu.
-
Landscape Architecture lab computers connect to four printers:
- “Student Copier”, “Student Ricoh” A multi-function color laser printer/scanner
- Blake 132: “sebs-la-student-copier_q” (Ricoh IM C4510)
- Standard Paper
- letter (8.5×11″)
- tabloid (11×17″)
- Standard Paper
- Blake 132: “sebs-la-student-copier_q” (Ricoh IM C4510)
- “Plotters”, “Large Format Printers”
- Blake 129: “sebs-la-plotter-2025-ps_q” (HP DesignJet Z6dr 44″)
- Standard paper (2 rolls)
- 36″ (roll 1)
- 24″ (roll 2)
- Standard paper (2 rolls)
- Blake 132: “sebs-la-plotter-130-ps_q” (HP DesignJet Z6dr 44″)
- Standard paper (2 rolls)
- 36″ (roll 1)
- 24″ (roll 2)
- Standard paper (2 rolls)
- Blake 129: “sebs-la-plotter-2025-ps_q” (HP DesignJet Z6dr 44″)
- “Student Copier”, “Student Ricoh” A multi-function color laser printer/scanner
-
- Document Size
Setting up your document the size it will be printed will simplify printing. Trying to enlarge to a specific size during printing can be challenging and lead to a lot of wasted time and supplies. Choose standard letter, tabloid, and Arch sizes when possible. - Application Print Menus
Files may be printed from most any application. Each has its own print setup menu and places to look for paper size and output settings. Printing a PDF file from Adobe Acrobat can help simplify printing as it has an easy to use print interface, but is not required. - Preview the Print
Make use of any print preview the software offers. - Opening a PDF For Printing
If printing a PDF, opening the file in Acrobat (right click then Open with… Acrobat) will give a better print menu and more control over paper sizes and other printing preferences than just letting it open in a browser. - Select the Printer
Don’t forget to select the printer before adjusting settings. See About LA Lab Printers below for printer names and descriptions. - Troubleshooting
See Troubleshooting above for common issues and some tips.
- Document Size
-
Arch A 9″ x 12″
Arch B 12″ x 18″
Arch C 18″ x 24″ *
Arch D 24″ x 36″ *
Arch E 36″ x 48″ ** Sizes marked with an asterisk * will not require cutting.
-
These instructions and screen shots show Adobe Acrobat’s print menu and apply to both of LA’s HP DesignJet large format printers (a.k.a. “plotters”).
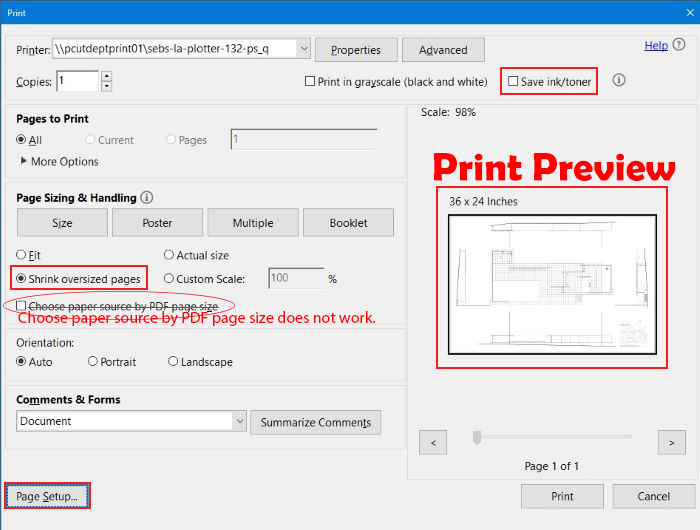
- For standard Arch page sizes (Arch A, B, C, D, E), use the Page Setup button in the lower left side of the initial print settings screen.
- Page Sizing & Handling
- “Shrink oversized pages” will reduce the design enough so that none of it is cut off.
- Use “Actual size” to retain scale.
- Avoid using the “Fit” option and uncheck “Choose paper source by PDF.”
- Orientation
For standard sizes, it is not usually necessary to change the orientation as long as “Auto” is selected for “Orientation”. - Print Preview
Check the preview window. It shows how the design will fit on the chosen paper size with the active settings. If it doesn’t look right, adjust settings.
-
These instructions and screen shots apply to both of LA’s HP DesignJet large format printers (a.k.a. “plotters”).
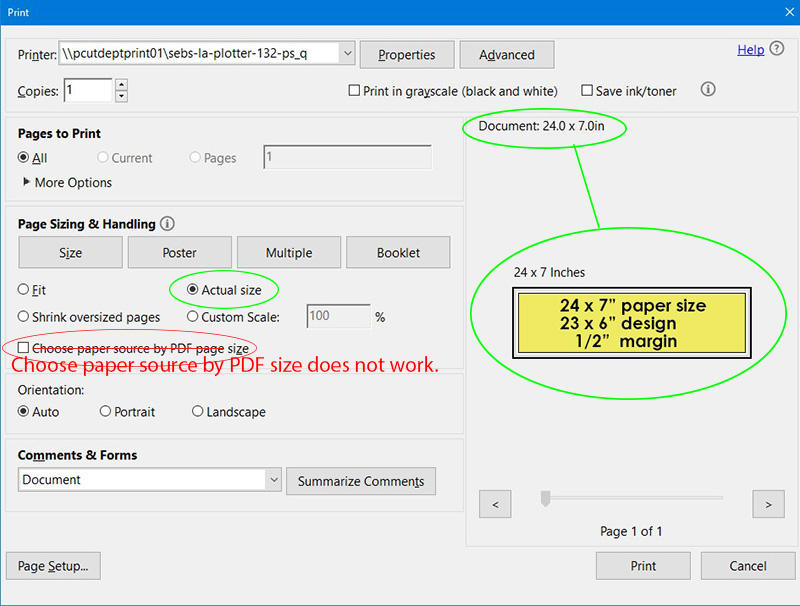
Printing to custom paper sizes requires setup in the Properties menu. If the print preview window does not show the design as it should be oriented on the page (Actual size or Shrink oversized pages), go into Properties.
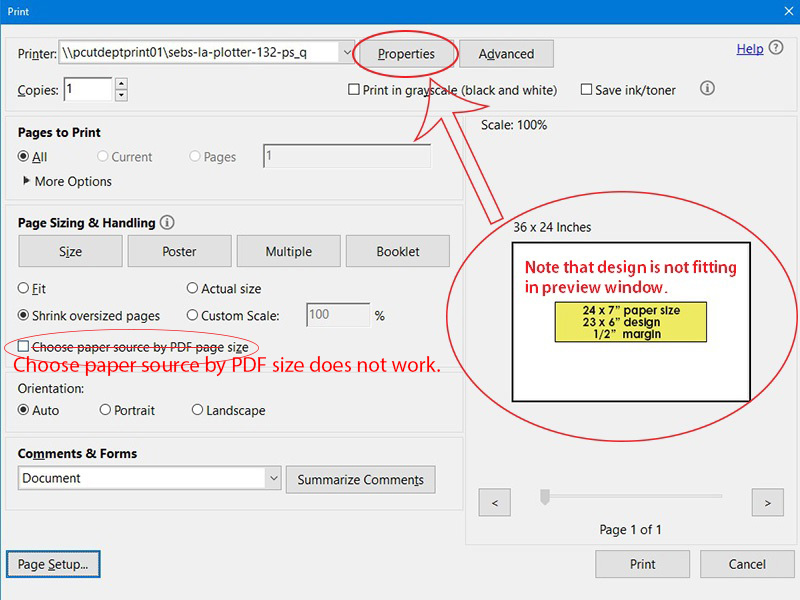
Click the Paper/Quality tab, then, under Paper Options, Custom to set up custom paper size.
Give the new paper size a name other than Custom so that you will know what it is if you need to reprint it.
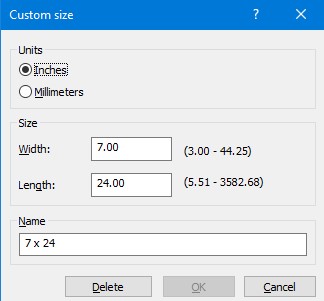
If your print is 24″ or less in width, choose Roll 2 in Paper source.
Click OK and you will return to the initial print window. The design should show in the preview window without extra white space.
Look very closely at the preview, you will see some gray around the margins. This is is space the printer needs. If the design extends into that area, it won’t print. Printing edge-to-edge can be done on the HP DJ Z6dr (v trimmer) with extra setup and planning. The Shrink oversize pages option will give the printer the space it needs.
Note about Fit and Custom Scale options: For reducing or enlarging a design, resizing in the application used to create it will likely lead to better results.
-
The HP Z6dr has, in addition to the main horizontal cutter, a vertical trimmer. This allows for cutting in both directions.
Keep in mind that the printer cannot print to edges of the paper (borderless). Instead, the design must be printed on paper with space around the edges that is cut away.

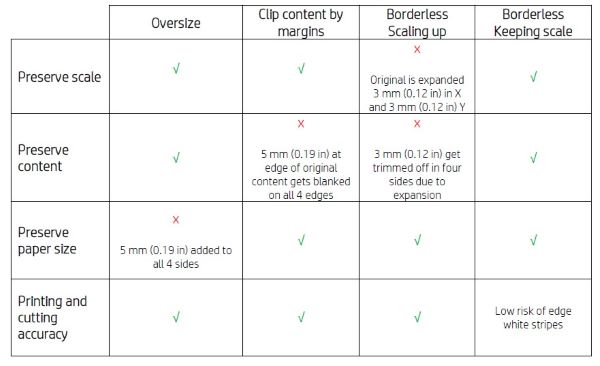
For more information about margin options, see the Vertical_Trimmer_User_Guide (PDF).
There are several margin options to consider. Rather than experiment and risk wasting ink and paper, ask LA IT for help.
-
Arch D and E sized Illustrator poster templates are available in the LA Coursework SharePoint site in
Documents / Data and Resources / PRINT_TEMPLATES.Download poster templates (requires access to Rutgers Connect – OneDrive).
-
Setting Up Print Tiling
- Open a large document in Adobe Illustrator.
- Press Ctrl + P (Windows) or Cmd + P (Mac) to open the Print dialog box.
- In the Media Size drop-down, select your standard paper size (e.g., Letter, 11×17).
- Go to the Options section and locate the Scaling drop-down.
- Choose one of the following tile settings:
– Tile Imageable Areas: Ideal for desktop printers that can’t print to the very edge of the paper. This divides the art based on your printer’s non-printing margins.
– Tile Full Pages: Divides the document based on the full dimensions of your selected media size. Useful if you have a borderless printer. - Check the preview window in the dialog box to see how your document is divided. You can adjust the Orientation (portrait vs. landscape) to minimize the number of pages needed.
- Click Print to send the pages to your printer.
Troubleshooting Printing
-
Files may be printed from most any application. Each has its own setup menu and places to look for document and output settings. Printing a PDF file from Adobe Acrobat can help simplify printing as it has an easy to use print interface.
From whatever application you use to print, make use of any print preview it may offer.
- Check the Jobs menu on the printer to see if your print job is in the queue.
- Check printers in other rooms.
- Look at the physical printer for error messages. Errors should be reported to LA IT (landarch-help@sebs.rutgers.edu).
-
- First, see the three “Printing Tips” sections above. All show print settings in Acrobat. Continue here if there is trouble.
- Print options missing
Open the file in Acrobat rather than in a browser window.- right-click –> Open with –> Acrobat
- Stuck flattening
If your file takes a long time to load on the screen or spends a lot of time “flattening” when printing, try optimizing the file. Save it as a copy.- File –> Save as other –> Optimized PDF
-
If optimizing the PDF doesn’t help, try Photoshop. Opening the file in Photoshop will flatten layers, rasterize vectors and make the file simpler for printing.
- First check to make sure it flattened the document into one layer.
- Window —> Layers
- File –> Print.
- Click Print Settings…
- Go to the Paper/Quality tab to set the paper size.
- Go to the Layout/Quality tab to set the quality.
- Click OK.
- The print preview should show the entire document fitting into the striped background without extra space.
- If not, check printer selection and click Print Settings for more options.
- The print menu isn’t as simple as Acrobat, so just please watch as it prints since getting the orientation right is a little trickier this way. If it starts printing and doesn’t look like it’s oriented correctly or the right size, cancel it from the printer’s front panel.
- If the orientation does not look right in the preview:
- First. try the Layout button.
- If that doesn’t work rotate it Photoshop so that it looks the same way it will print.
- Image –> Image Rotation
- First check to make sure it flattened the document into one layer.