Working with Kaltura
Kaltura is a video hosting service that anyone in Rutgers University can use. It is fully integrated in most learning management systems, and allows you to upload, embed, and share your media content throughout whatever platform you are using.
Here are some of the basics of Kaltura:
-
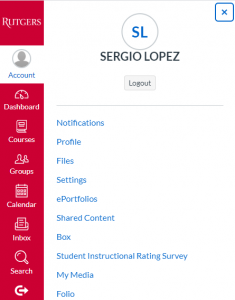
Kaltura is automatically included in each Canvas account. If you go to “My Media”, you will be prompted to allow Kaltura access to Canvas. Click “Authorize” (on the lower right of the prompt).
- In the “My Media” page, click on “Add New” in the top right. Then select “Kaltura Personal Capture”.

- This should lead you to the download page, where you can follow the prompts to put the application in your machine.

- This will always take you to the download page for the Personal Capture Desktop Recorder, but you only need to download the Recorder once. After that, the Recorder will open automatically whenever you select the “Kaltura Personal Capture” option. You may also record and upload directly from the Personal Capture application by opening it from your Applications menu.
- Once downloaded, you can start the application by clicking “Add New” and selecting “Kaltura Personal Capture”.
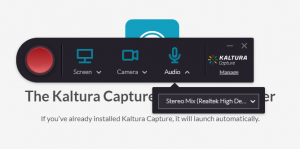
- Click on the big red “Record” button to start recording. You should see a three-second countdown before the recording actually starts. You will see a list of options of what to record, including screen, camera, and microphones.
- Click on the red square “Stop” button to stop recording. It will ask if you’re sure you want to save, and clicking “Yes” will open up the Library.
- From here, you can choose “Save” to only record it to a designated folder in your machine, or “Save and Upload” to upload it to your Kaltura account. If you choose the latter, the video will be visible under “My Media” (when it has finished uploading and processing).

- In the “My Media” page, click on “Add New” in the top right. Then select “Kaltura Personal Capture”.
-
Kaltura is fully integrated into Canvas, making it easy to share videos to your students. All videos uploaded into “My Media” can be embedded to a Canvas course site.
- In the section of Canvas where you wish to embed a video, click on the icon that looks like a plus sign
 . This will open a new window.
 - In the drop-down menu, select “Page”, then select “[New Page]” in the field beneath that. Enter a name for this new page and then click “Add Item”.

- The new page will be added to the end of the section. Click on the title of the page to open it.

- Click “Edit” on the top right of the page.

- Click the downward arrow icon in the toolbar above the Rich Content Editor window and then on “Embed Kaltura Media”. It will be beside the YouTube icon.
- You should see a pop-up window displaying all your Kaltura media files. Click the “Select” button directly to the right of the video you wish to embed.
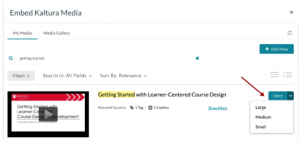
- You may also change the resolution of the embedded video by clicking on the arrow to the right of the “Select” button. Your options are “Large”, “Medium”, and “Small”.
- Then you will see the video added to the text editor. Scroll down and click “Save” or “Save and Publish”.
- In the section of Canvas where you wish to embed a video, click on the icon that looks like a plus sign
-
Kaltura on Canvas keeps all media in the Kaltura Media Gallery. This is where all recordings with the apps go once they are finished. You may also upload existing videos into the gallery.
- Log into your Canvas account.
- Click Account link in the left navigation menu and select ”My Media”.

- In the “My Media” page, click on “Add New” in the top right. Then select “Media Upload”.

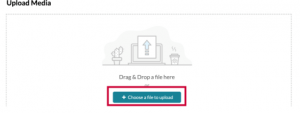
- Once you are in the Media Upload page, you can click “Choose a file to upload” to select a video file on your computer to upload. You may also drag and dropp the file in the upload area.
- The file will then start to upload. When the blue bar turns green and it states Upload Completed, scroll down and complete the rest of the details:

- a. Fill out the name of the media. It will default to the file name of the media uploaded. This area is required. The following areas are optional.
- b. Add a description of the content.
- c. Add any tags. Tags help you organize your files by associating them with one category. Type the word or letters with which you wish to tag your media – ex. BIO101 – and select the tag that appears that matches your designation.
- Once you have finished editing this information, click on “Save” on the bottom of the page. The video will take a few moments to process before it can be played (depending on the size, it may take longer).