Working with Zoom

Zoom is a video conferencing tool that has proven to be a big help in higher education. Whether it’s for online classes, department meetings, or larger seminars, it provides multiple options for remote communication.
Here are a few tips to get you started with using Zoom.
-
NOTE: This set of instructions is based on the assumption that you are not initiating the meeting, and that you have not already installed Zoom on yourmachine.
- Follow a meeting URL provided by the host of the Zoom meeting. These generally follow the format “shprutgers.zoom.us/j/(meeting ID)”.

- If the Zoom application is not installed, you will be prompted to install it on your machine. Follow the installer instructions.


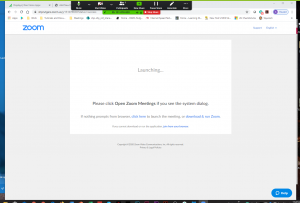
- After the initial installation, whenever you follow subsequent Zoom URLs, it will open automatically (usually preceded by a prompt asking you to open it).
- After installing, Zoom will enter the meeting automatically. You should see a pop-up preview of what your computer’s webcam will capture, then be asked if you wish to share your webcam in this meeting.

- Once you enter the meeting, you will be prompted to connect to the computer’s audio. Clicking this will share your microphone through this meeting.

- Please note that if you do NOT choose to connect to the computer’s audio, you may not be able to hear other people in the meeting.
- There is also an option to have all audio go through a phone. The instructions to do so can be found here:

- Once you’re connected, you should by default see your webcam (if you chose to share it), as well as a toolbar at the bottom of the window and whoever else is logged into the meeting.

- Clicking on the bottom left corner will allow you to mute or unmute your microphone.

- Click on the arrow next to the microphone icon to change the microphone and/or speaker used in this meeting. You can also test your audio in this window.

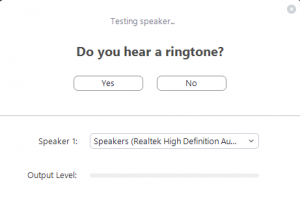
- Click on the arrow next to the microphone icon to change the microphone and/or speaker used in this meeting. You can also test your audio in this window.
- Click on the camera icon to turn on or off your webcam If you chose to share it).

- As with the microphone, you can click on the arrow to the left of this icon to choose which webcam to share (if your computer is connected to more than one). You can also choose advanced options, such as video quality shared and a virtual background.
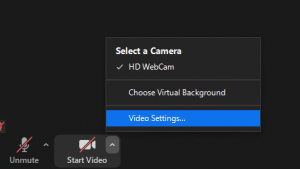

- As with the microphone, you can click on the arrow to the left of this icon to choose which webcam to share (if your computer is connected to more than one). You can also choose advanced options, such as video quality shared and a virtual background.
- Click on the “Participants” icon to open the Participants window. This is where you can see everyone logged into the meeting.

- If you hover your cursor over your name, you will see a number of options, including the option to change what name is displayed.
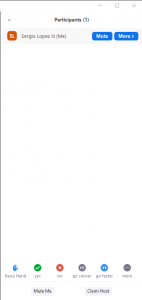
- At the bottom of this window, you will see a few status options. Likely the most important one is the option to “Raise Hand”. This indicates to the host of the meeting that you would like to speak. Other options, such as “Agree”, “Disagree”, “Speak Faster”, and “Away”, are also available.

- Click on the “Chat” icon to open the Chat Window. This is an in-line text communication tool that allows users to send messages to the rest of the meeting.


- By default, all chat messages are public, and thus will be seen by everyone in the meeting. However, you may choose to send a message privately to a single person in the meeting by selecting their name in the drop-down menu right above the entry area.

- Once the meeting is over, click on “Leave Meeting” in the bottom right of the window to close Zoom and leave the meeting.

- Follow a meeting URL provided by the host of the Zoom meeting. These generally follow the format “shprutgers.zoom.us/j/(meeting ID)”.
-
One of the most useful tools in Zoom is the ability to share a screen in a meeting. This allows other participants to see what is on your computer’s display, such as important documents and PowerPoint presentations.
PLEASE NOTE: As of March 2020, the default setting only allows the host of a meeting to share. This option can be changed by clicking on the arrow to the right of the Share icon and selecting “Settings”.


- Click on the green “Share” icon in the center of the toolbar at the bottom of the Zoom window. This should open up a window showing all the possible things on your machine that you can display to other users.

- You can choose to share your computer’s entire screen, or one specific application that is open. Once you have chosen what to share, click “Share: on the bottom right of the pop-Up.
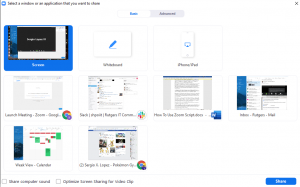
- We generally recommend that you share your entire screen when using PowerPoint.
- Click on the checkbox “Share Computer Sound” to allow others to hear whatever sound is being used in the content you are sharing. This is helpful for when you are sharing video clips or audio.

- When a user is sharing a screen, Zoom will switch to full-screen by default. Also, the toolbar will relocate to the top of the window, with a red icon under it labeled “Stop Sharing”, which allows you to stop sharing your screen.
- Other participants in the meeting will appear in a pop-up window as a row of webcams (or just their names). You can freely move this pop-up to other locations on the screen, and choose how large it appears.
- When using this feature with a computer with multiple displays, it is important to remember which display you are sharing. Also, try not to use any feature that makes an application appear different on multiple displays, like Presenter View in PowerPoint.
- Click on the “Stop Share” icon to return to the default view.

- Click on the green “Share” icon in the center of the toolbar at the bottom of the Zoom window. This should open up a window showing all the possible things on your machine that you can display to other users.