Recording a Meeting
WebEx Meetings can easily be recorded and shared directly through the WebEx platform or downloaded and shared through other platforms.
Starting a Recording
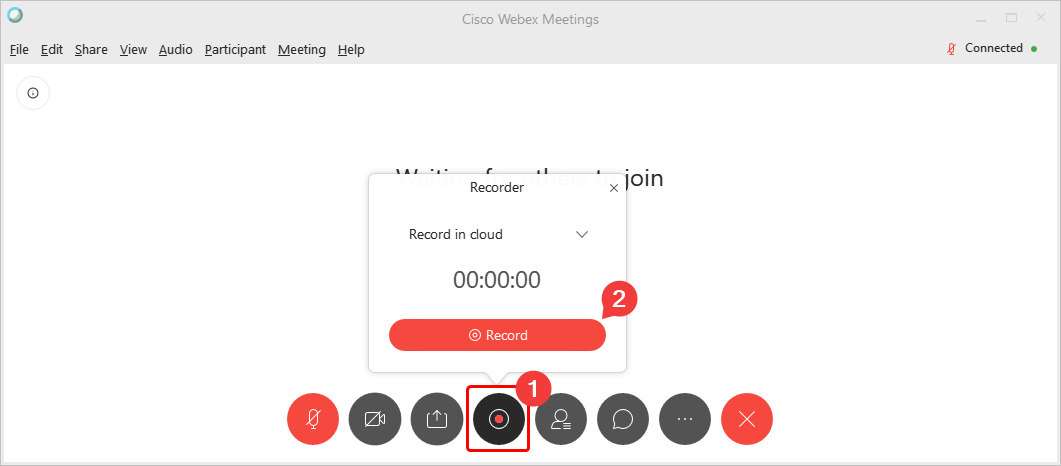
Once a WebEx Meeting has begun simply select the Recorder button (Fig 1 # 1) and then select Record (Fig 1 #2). You can stop the recording at any time, otherwise the recording will automatically stop once the meeting has concluded.
Alternatively, a scheduled meeting can be configured to automatically record when the meeting starts. To do so, select Automatic Recording under the Advanced Options (Fig 2) section of the meeting scheduling form.

Downloading and Sharing Recorded Meetings
Once a recording has completed it can be accessed via the WebEx homepage to be shared or downloaded. Please note that WebEx does require some time to process your recording and they may not be available immediately after concluding your meeting. Processing times of several hours should be expected during high volume periods.
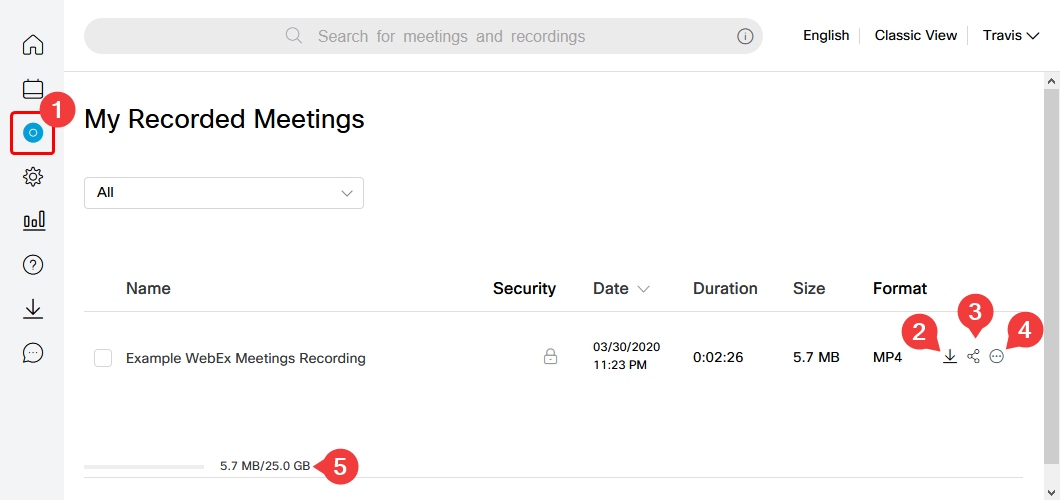
To access your recordings, log into the WebEx Meetings homepage and select Recordings from the navigation menu (Fig 3 #1).
Select the Download button (Fig 3 #2) to download a .MP4 version of your recording to be shared through another platform such as the Canvas LMS.
Select the Share button (Fig 3 #3) to share the video directly through the WebEx platform. Invited users will be emailed a link to the password protected video which can be viewed directly through their browser.
Hover over the More Options button (Fig 3 #5) to either delete or edit the video. Selecting More Options > Edit will display the Edit Recorded Meeting screen under which you can rename the video, provide a brief description, and choose to include other features such as chat transcripts, a list of participants, and more.
Rutgers Faculty and Staff are provided with 25GB of video storage, enough to store several hundred hours of recordings. The amount of storage currently being used by your recordings is located at the bottom of your My Recorded Meetings screen (Fig 3 #5).
Additional Recording Options
To select a recording layout log into the WebEx Meetings homepage, select Preferences from the navigation menu and then select Recording (Fig 4). There are three recording views available, each containing a layout for when content is being shared (such as a PowerPoint) and when content is not being shared.
A recording view preference takes place at your account level and applies to all recorded videos. Recording views cannot be changed for specific recordings, nor can the view of a previously recorded meeting be changed.
The default recording view is the Video thumbnails view in which content shared with the meeting is displayed in the main portion of the recording, and a thumbnail view of the speaker and recent participants is shown across the top of the screen.
It is recommended that for recording lectures, either the Active speaker view or Content-only view be selected as your default recording view.
